Thursday, 29 September 2016

Preserving peppers

Today I picked my pair of purple pepper plants and processed the peppers into pretty pickled purple peppers...

As the season comes to an end I am always looking for ways to preserve my excess peppers. I have already mad a couple of different sauces and salsas which have worked well. As I cut back a lot of pepper plants today I had a bit of a glut.
Pepper glut

The first method I chose to try was pickling. I had a lot of green unripe and purple chunky pods which would be well suited to pickling. I cut these into rings and placed in a colander so I could wash away the worst of the seeds. I then put these in a large jar. I also added a few yellow and red peppers for a bit bit of contrasting colour. I then heated in a saucepan equal parts water and vinegar, I added a generous amount of salt and black pepper, then brought this too the boil, before turning down to a simmer. After five minutes I turned this off and poured it over the peppers. I filled the jar to the brim and place a rolled up ball of cling film on top. this was to hold the peppers under the brine/vinegar mixture, once the jar is then sealed shut.
Pickled peppers

Next I decide to try make some chilli jam. for this I cheated. I used some shop bought apricot jam as a base. In a blender, I added three nectarines and some big sun Habanero pepper pods. I then transferred this too a saucepan, added more sugar and brought to the boil. I then turned this down to a simmer until it reduced to the desired consistency. I filled up 2 small jars with this jam and they have both set nicely. this jam is ready to use strait away and is nice with meat and cheese.
Finished jam

Of the peppers I had left, all the thin walled (thus easy to dry) varieties were threaded on to a ristra. these varieties will dry in the kitchen window and will be made into powder later.
Ristra


The remaining peppers were dried using my dehydrator. this is useful when drying thick walled peppers that otherwise might mold if left to dry naturally. This is the first time I have dried green peppers but as i had lots I thought I would give it a go. I also added some of my tomatoes to see if they would dry.
Dehydrator


There are many other ways to preserve peppers and I will try others as I harvest the last of my pepper plants but After all that lot it will be while before I feel like venturing back into the kitchen.

Wednesday, 28 September 2016

Planting a Foreground

first some background. My main planted aquarium has been running for two years and has gone through many changes over that time. Initially the tank had a hair-grass, microsword and Sagittaria foreground but over time this has disappeared leaving the front of the aquarium bare sand.
full tank shot with old light and no foreground

There are a few reasons I lost my foreground plants, one was lighting. The aquarium was lit by two 30watt LED security lights. This worked OK until one of the lights started to flash, so was removed. With only one light the foreground plants struggled as there was only enough light in the centre and many of the crypts in this area started to shade other plants.

Another reason my old foreground plants disappeared was the presence of three stiphodon gobbies. These were great fun to watch and ate a lot of algae. The problem was there burrowing under the substrate. They did this a lot which dug up most of the foreground plants on a regular basis. This constant digging-up stopped the plants flourishing.

Recently upon seeing an old picture of my aquarium I decided I would like to grow a foreground carpet once again. Firstly to solve the lighting problem, I have installed a purpose made aquarium LED fixture over the aquarium. This not only increases the overall brightness but also gives a much more evenly distributed light.

Next I removed the stiphodon, fun to watch as they were, there constant digging was annoying. I also removed many of the other fish as I fancied a change. As well as the aforementioned gobbies I removed galaxy rasbora, redline rasbora (very nice but never came out of hiding no matter what I did), rasbora hengeli, a plakat (short fin) Siamese fighter and various odd fish that I collected over the years. I decided to leave the cherry shrimp, amano shrimp, bristlenose catfish and pygmy corries. I have also added some tiger endler males and various guppy females.

The aquarium was now ready to plant. I chose to use eleocharis (hairgrass), hemianthus callitrichoides and pogostemon helferi. These three varieties have a very different growth habit, leaf shape and overall look. I have had a hairgrass and pogostemon carpet in this aquarium before. The conditons may not be good enough for the Hemianthus but I will give it a try (normally prefers stronger light and additional CO2).
Hairgrass                                                     Hemianthus

As can be seen in the pictures above, when you buy potted aquarium plants they come tightly packed in there pots. From my experience when plants are left like this and planted whole they end up yellowing and dying. The only way I have found to grow these plants into a carpet is to separate these plants into very small pieces and spread them over a larger area. This gives each individual plant enough light and space to establish and spread.
Individual Hairgrass plant.        Hairgrass planted over wide area.

Hemianthus spread out.              Pogostemon spread out.

Overall aquarium shot

Now its just a waiting game to see it fill in. The hairgrass and pogostemon should fill in both ends, and hopefully the hemianthus will carpet the centre.

Sunday, 25 September 2016

Chilli pepper update - harvest and grow area

Just a quick update today. As the season winds down my last few varieties which will fruit this year are ripening up. This year is the first year I have successfully grown a  chinense variety outside rather than in a polytunnel or greenhouse. My "big sun habanero" has been outside since I got it. and has produced pretty well, if a bit late. I cant wait to do some cooking with these pods, as they are very hot but delicious. Chinense peppers are my favourite to cook with as have a unique fruity tropical flavour. I'm thinking "peach chilli jam", as I made a small batch of this before and it came out very nice, served with bread and cheese. The sweetness of the jam helps make the heat more bearable and the fruity flavour works brilliantly with peaches.
From left to right
Top row - Cheyenne, ? Unidentified like Apache but chunkier, Apache
Middle row - Gustav purple, Chenzo, Aji lemon, Superchilli F1
Bottom row - Big sun Habanero, not Carolina reaper (that is what they were labeled in the garden centre but clearly they are not), Cayenne


The plants outside are all ripening peppers. At this time of year its always difficult to judge when to cut down my plants and bring them indoors. Too early and I lose the chance to ripen all the remaining green pods. Too late and the frost will hit and kill the plants, preventing me from overwintering. 
Here is my outside Apache, Gustav purple and Hot banana

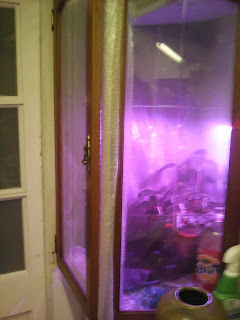
The first of my overwintering areas is rapidly filling up. I have insulated the window its next to with 3 layers of bubble-wrap. It has some recycled glass cupboard doors and a polystyrene top. it is lit by a small grow-light. its the first time I have used a purpose made LED grow-light bulb rather than a generic white bulb. I may use a 6500k (daylight) LED bulb over the other area (still under construction), to see if it makes much difference.
Here is the grow area
Inside with light on and off

This set up seems to give me the best of both worlds. The peppers get some natural sunlight but supplemented with artificial light. I just hope there is enough insulation on the window.

Just for fun I leave you with a photo I made to act as my Facebook picture as i do not like using a photo of myself


Friday, 23 September 2016

Larger reservoir for self-watering pots

Today I tried out my idea for next years self-watering pots, using a polystyrene box as the reservoir. Over the year I have found that if I keep a pepper plant in a 10cm pot but give the roots access to water and nutes (nutrients), the plant can grow very large and produce a lot of peppers.

I did this my keeping the 10cm pot inside a plastic pint cup with a wick hanging down like this.

The reservoir can then be filled to about 1.5cm below the bottom of the pot. This is because the roots need access to air (oxygen) as well as water/nutes. If the cup was full up to the pot the peppers roots would rot.

On the whole this method has worked very well and I plan to keep a lot more plants in these pots next year. The only limitation of this method I found was the reservoir size - I had to refill the larger plants everyday. I had an aji lemon in a 10cm pot inside a 2litre bottle, it still needed refilling every 2-3 days, but it did get about 5 foot tall!

That's where the polyboxes come in. I have an almost limitless supply of these free from work. Holes in the lid can easily be cut for any size pot and they hold over 20litres of nutes.

Over winter the plastic pint cups will be fine, as the peppers will need far less water. So as a test I thought I would  plant some kale plugs I got in the garden centre for growing over winter.

I started by drawing round the top of the 10cm pot. Then I cut inside the outline so the pots wouldn't just fall through the holes. The beauty of using these boxes is how easy they are to cut, I just used a serrated steak knife to saw round inside the line.
I then cut some strips of capillary matting to use as wick.

I pulled the wicks through the bottom of the pots and filled with soil. I planted six kale plants in these pots and filled the reservoir with half strength growth fertilizer. This is just a test but if these kale does well I will probably put all my small pepper plants in pots like this.

Well that's a rap... I will leave you with a photo from my first ripe chinense of the year, My not so big,"Big sun habanero

Thursday, 22 September 2016

Trimming my Colt coral (Cladiella sp)

Today I finally took the plunge and decided to trim my huge Colt coral Cladiella sp. I added this coral when I first set up my reef aquarium. It has done very well, almost too well. It has grown a lot, shading other corals. Also its bottom half was starting to struggle because the top half was shading it. The aquariums sole point of focus was this coral and I could barely see the fish.
The tank before cutting

That said It took me a long time to gather the courage to trim it. I did not fancy just jumping in there and hacking my best growing coral to pieces.

Rather than take apart the whole tank, I decided to try and cut the coral in the main tank. From what I had read around forums this coral was easy to cut and wouldn't release much into the water. As a precaution I put a new bag of carbon in the filter to absorb any chemicals released, I also added a bag to the refugium where there cut off "frags would be housed.

Next I decided i would use a pair of very sharp scissors rather than a knife, which most people prefer. Me be a fairly clumsy person I thought scissors would give me the best chance of making a clean cut.

I only cut off three branches as an experiment, both to see how the coral would react and because I don't have much space to house the frags.This still made a huge difference to the look of the aquarium.
Here is a full tank shot a few hours after the cuts.

This coral always closes and produces mucus when you touch it any way, so I was expecting it to produce lots of mucous when I cut it. It didn't actually produce any more than when I brush past the coral cleaning. The coral seemed to return to normal very quickly. The wounds even seem to be closing over.
Here are the "stumps".


The frags of coral were put in refugium on some rubble in a low flow area, I did not attempt to attach them to rock as I am not good at them sort of fiddly jobs and hopefully they will attach themselves. These almost immediately opened up there polyps
The frags

So overall I think that has all gone so far so good. If nothing goes wrong with the main piece and the frags I will trim some more branches in a month or so time.

Monday, 19 September 2016

Overwintering Peppers

In the UK we have a short growing season for growing peppers. Many peppers need a long time to ripen and if the plants are treated as annuals, they do not ripen fruit before the first frost. In order to remedy this plants can be kept indoors overwinter for an early start next year.
There are several methods of doing this. Plants can be left full size and kept like a houseplant, although watering far less than during the summer. If like me you are growing over 40 varieties, its a  good idea to cut them back and put them in smaller pots for the winter, so that more plants can be saved.
The other thing to take into account is how fast a grower the pepper is. With fast growing annuum varieties its less important to overwinter as new plants can be grown from seed early next year. Also larger podded annuum varieties don't seem to overwinter well. On the other hand there are many chinense varieties it can be difficult to get a crop off in the UK in one year. These make ideal candidates for overwintering.

Here is a pepper (Aji lemon Capsicum baccatum) that has been cut back a couple of weeks ago ready for coming indoors.

This year as well as my large plants from this year, I have many small plants that I will try to overwinter. These will have to be kept pruned to a reasonable size until the weather warms up as I do not have a huge amount of space.

 I recently topped all my chinense small plants, too encourage them to stop growing taller and to concentrate on bushing out. This involves cutting off the growing tip so that new shoots grow from each leaf node (where the leaves connect to the stem). This can be quite scary as it can look like your destroying your plant you have spent months growing. It looks drastic when first done but in the long run plants that have been topped produce a lot more peppers from a more compact plant.
Here is a plant (Cumari pollux, Capsicum praetermissum) that is at the height where it is ready to be topped.

Here is a plant (Tobago seasoning, Capsicum chinense) that has been topped. I will leave the big leaves till the new shoots grow, otherwise the plant has nothing to take in energy.

Here is a plant (Giant rocoto, Capsicum pubescens) that has been topped a couple of weeks ago. As you can see new shoots are growing from the leaf nodes. This plant is almost ready for me to chop off the big leaves.

Over winter as well as keeping the plants pruned to a reasonable size it is important to keep them somewhere warm enough and with enough light. peppers can be overwintered on a sunny south facing window sill. This can be a problem in my house as we do not have double glazing. consequently window sills tend to be too cold in winter for keeping many of my chilli varieties (maybe OK for capsicum pubescens varieties).
if you do not have warm window space then artificial lights can be used. Many people use purpose made grow tents which work well , but any space out of the way like a cupboard, can be used. I have gone with the best of both worlds and used a window that i have insulated with two layers off bubble-wrap and added a supplementary grow-light. I have another area in one of my aquariums cabinet that is also lit with a small grow-light purchased from china on eBay for very little money.
It is important to keep a close eye on all indoor peppers as than can quickly become infested with pests. like aphids. it important to hit pest hard before they get a chance to destroy a plant.

Hopefully by these methods I should have some already mature plants that are starting to produce peppers before they go out after the last frost next year.